Advanced MeshGroup Reference
Why and where to use MeshGroups
MeshGroups are useful when constructing large static objects out of many smaller ones. In our examples, we build entire rooms out of wall and celing prefabs. For example, the Room2x2.5U object consists of 36 objects (walls, half walls, ceiling tiles, floor tiles and so on). It would be prohibitively expensive to build an entire scene out of tiny objects like this, and these tiny objects would also look very repetitive.
MeshGroups makes the geometry unique and merges them into one larger mesh. Since the meshgroup now has unique geometry for all the meshes attached to it, you can apply unique vertex paint onto the mesh to give it a unique look.
Advanced settings
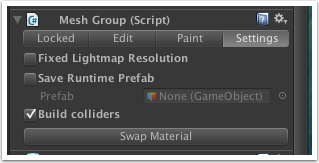
Fixed Lightmap Resolution
Meshgroups normally inherit lightmap sizes from the Unity lightmap bake settings. In certain cases, especially when tightly packing lightmap UVs in your 3D pacakge, it is desirable to simply tell Unity to use a fixed size for lightmaps. With fixed lightmap resolution enabled, the Base resolution per mesh setting decides the lightmap size for each object in the meshgroup. Eg. if you set base resolution per mesh to 32, each mesh in the meshgroup gets a 32x32 texture space. You can further tweak this by adjusting the scale in lightmap parameter in the Unity lightmapping window. Selecting an object and giving it a scale in lightmap of 2 would then give it a 64x64 space in the atlas.Save Runtime Prefab
It is not possible to instantiate meshgroups as none of the build and processing code is available to the runtime. It would also be prohibitevly Instead, you can save a prefab from a mesh group - this creates a prefab with the associated mesh data in the project folder which you are then free to instantiate at runtime.Build colliders Unticking this will not build composite mesh colliders for the mesh group.
Swap Material Allows you to quickly batch-swap materials on all objects in the meshgroup simultaneously.